Program an Arduino Pro Mini 328 [sparkfun] board using a Bus Pirate.

Bus Pirate programming Arduino Pro Mini 328
I tried setting up the Bus Pirate as a transparent bridge for UART to use the Arduino boot loader. I got as far as manually sending 0x30 0x20, and receiving a 0x10 0x14 – establishing communication over UART… But couldn’t get the Arduino IDE to actually upload a program to it.
It turns out – version depending – that avrdude can use the buspirate as an SPI programmer.
http://dangerousprototypes.com/docs/Bus_Pirate_AVR_Programming
Wiring for SPI
A bare minimum 4 connections need to be made for the communication: MOSI, MISO, SCLK, GND. The Arduino also needs VCC and the reset pin needs some manipulation. I made 6 connections.
Pinout for my Bus Pirate: 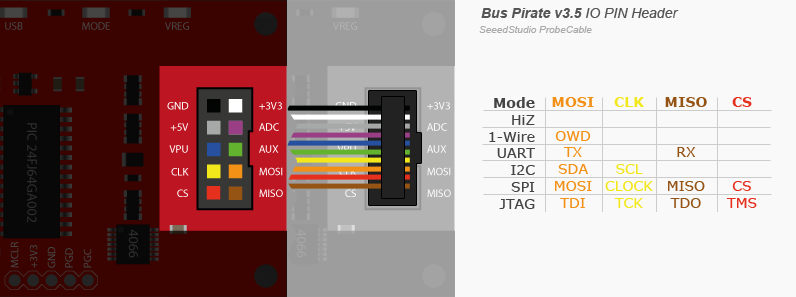 http://dangerousprototypes.com/docs/Hardware_overview
Schematic for Arduino-Pro-Mini 328 showing connections – note the locations of MSIO MOSI and SCK. This schematic shows the actual ATMega328P pin numbers, but not the pin numbers labeled on the breakout (and used in the Arduino IDE)
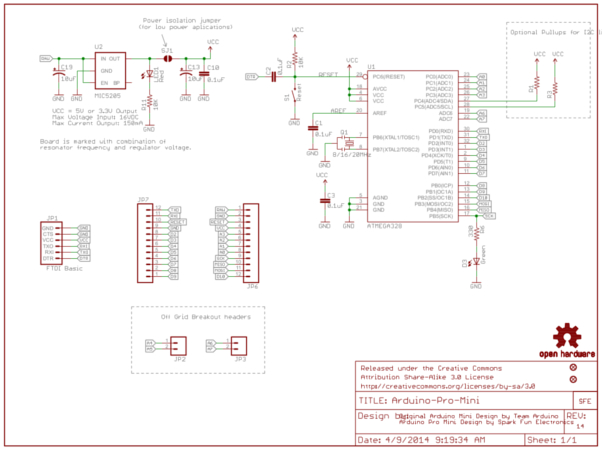
https://cdn.sparkfun.com/datasheets/Dev/Arduino/Boards/Arduino-Pro-Mini-v14.pdf
https://cdn.sparkfun.com/datasheets/Dev/Arduino/Boards/Arduino-Pro-Mini-v14.zip
6 Connections Made:
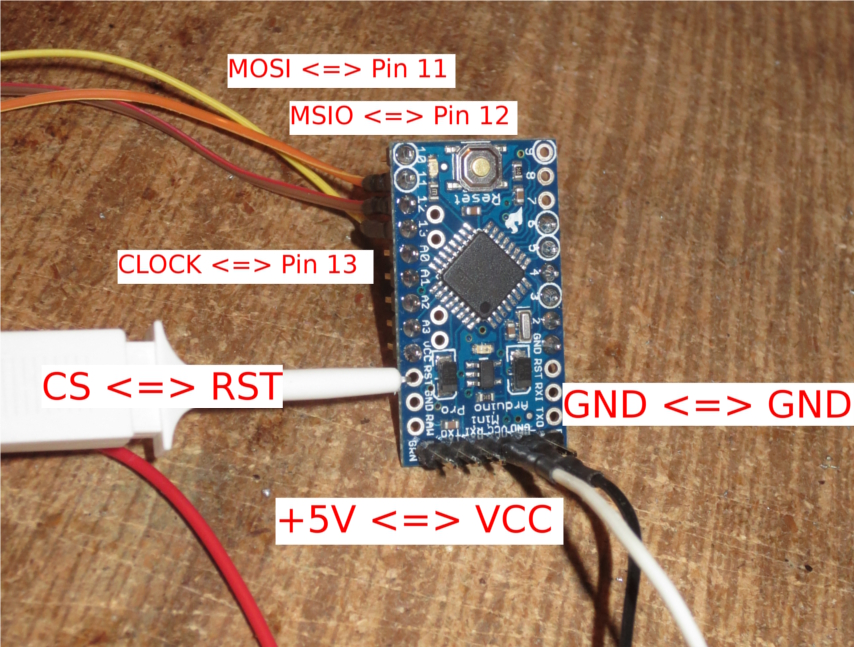
| Bus Pirate | Arduino Pro Mini 328 |
| +5V (gray) | VCC |
| GND (black) | GND |
| MOSI (orange) | Pin 11 |
| MISO (brown) | Pin 12 |
| CLOCK (yellow) | Pin 13 |
| CS (red) | RST |
Test Bus Pirate connection
$ avrdude -c buspirate
avrdude: No AVR part has been specified, use "-p Part"

Valid parts are:
  t10  = ATtiny10        [/etc/avrdude.conf:16881]
  t9   = ATtiny9         [/etc/avrdude.conf:16837]
  t5   = ATtiny5         [/etc/avrdude.conf:16793]
  t4   = ATtiny4         [/etc/avrdude.conf:16749]
  ucr2 = 32UC3A0512      [/etc/avrdude.conf:
...
read the list, my part is m328p
$ avrdude -c buspirate -p m328p
avrdude: ser_open(): can't set attributes for device "/dev/ttyS0": Inappropriate ioctl for device

avrdude done.  Thank you.
Third try is a charm.
$ avrdude -c buspirate -p m328p -P /dev/ttyUSB0
Detecting BusPirate...
**
**  Bus Pirate v3a
**  Firmware v5.10 (r559)  Bootloader v4.4
**  DEVID:0x0447 REVID:0x3046 (24FJ64GA002 B8)
**  http://dangerousprototypes.com
**
BusPirate: using BINARY mode
avrdude: AVR device initialized and ready to accept instructions

Reading | ################################################## | 100% 0.01s

avrdude: Device signature = 0x1e950f

avrdude: safemode: Fuses OK

avrdude done.  Thank you.
Success!
I initially had the CS wire connected to GRN – which wasn’t pulling the reset pin down. Avrdude was giving an error:
avrdude: initialization failed, rc=-2
         Double check connections and try again, or use -F to override
         this check.
Connecting CS to RST fixed this. Alternatively, you can hold the reset button down during the execution of the commands.
Make it work with the Arduino IDE
Turned out to be deceptively simple.
Thanks http://www.adafruit.com/blog/2011/05/09/using-bus-pirate-with-arduino-ide/
(https://taylanayken.wordpress.com/2011/05/04/using-bus-pirate-with-arduino-ide/)
$ cd arduino-ide-location

$ vi hardware/arduino/programmers.txt
Add three lines:
buspirate.name=The Bus Pirate
buspirate.communication=serial
buspirate.protocol=buspirate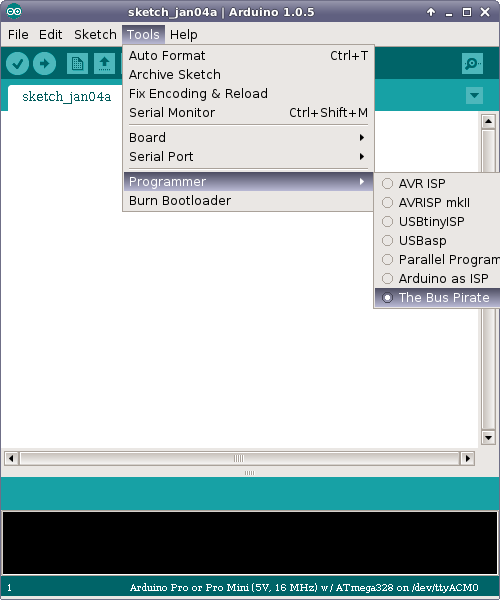
Load your project, select the Bus Pirate as the programmer, select the right board, serial port. Instead of “Upload”, shift-click it for “Upload using Programmer” or File->Upload using Programmer.
Hello,
Nice way. Good for uploading the bootloader.
I’ve poste here http://wiki.flav.com/wiki/Arduino_Bus_Pirate a method in order just to upload a sketch.
Regards,
Flav
This is interfacing directly with the ATMEGA328P’s SPI pins. Any compiled binary can be uploaded with avrdude.
In my case I didn’t use the Arduino bootloader, but it was still convenient to use the Arduino IDE to send the program.
It does take a lot longer to program the sketch this way compared to if you can get the bootloader working.
I wasn’t successful at getting the programming working over UART – but I might revisit that again with your post. Thanks!